Tuesday 12 August 2014

Tandoori Chicken


Hello again. I know it’s been a while….. but as you may know the 3rd year at uni is a busy one. Now that I’m free from academia I’m certainly looking forward to getting truly fascinated with food once again.

For my returning entry I decided to venture to India for inspiration.  I love eating Indian food and it’s about time it got a mention on the blog. I decided to try my hand at Tandoori chicken, a much-loved British curry house favorite. However, unlike much of the Indian cuisine we eat in the UK, Tandoori chicken actually originates from Northern India. The dish gets its name from the oven in which it is cooked, a ‘Tandoor’. For my version of this classic dish, a tandoor is not used and neither is it necessary,………however it would have been bloody great. This dish unlike other Indian dishes (curry) is great to have on a hot day as a replacement for other BBQ classics (kebabs and hot dogs). The moist chicken and fresh yogurty marinade makes it truly satisfying to eat. And when it is served with a coconut naan bread and a light salad its sublime.  

At this point I ought to mention that I tried making my own naan bread, and I would be lying if I said it went well.  So, no mention of naan bread in this post, but feel free to have a go and let me know if you have better luck. Despite this minor hiccup, the meal was delicious.  Enjoy! 


Serves 4

Ingredients

Tandoori Chicken

1 kg skinless chicken thighs
½ a big pot of plain yogurt
2 tbsp fresh lemon juice
1 tbsp minced garlic
1 tbsp fresh peeled and crushed ginger
1 tbsp ground cumin
1 tsp ground coriander
½ tsp cayenne pepper
¼ tsp ground cardamom
¼ tsp ground cloves
¼ tsp ground black pepper
2 tsp salt
Vegetable oil, for brushing
Fresh coriander to garnish

Side Salad

½ cucumber sliced into thin strips
1 large tomato sliced thinly
½ large onion sliced into strips
1 handful of chopped coriander
Salt and pepper of seasoning
½ lemon juiced


Method

1.Firstly, the marinade. As with any marinade the longer the better. Therefore, I recommend leaving the chicken overnight to marinade. However, if you are not that organised (like me) 6-8hrs in the fridge is good enough.

2.Place all the ingredients into a large bowl except for the oil and coriander. Mix well and set aside.   Before placing the chicken in the marinade make sure you score each thigh a few times to allow the marinade to soak in.

      3.Leave in the fridge…. overnight, if possible.

      4.Place a layer of foil over an oven rack, then make a few holes to allow the chicken juices to drain.

      5. Pre- heat the oven to 200 degrees C and remove from the fridge half an hour before cooking to get the chicken to room temperature.

      6.Place thighs on the rack then brush with oil.

      7.Cook for around 40mins, turning the thighs half way through.

      8.While the chicken is cooking, slice and dress the salad and set to one side.

      9. To check the chicken is cooked just slice one open and if the juices run clear and the flesh is not pink, you are ready to go.

      10.Serve with naan bread (if your daring) or rice, …. fresh coriander and salad.

Monday 11 November 2013

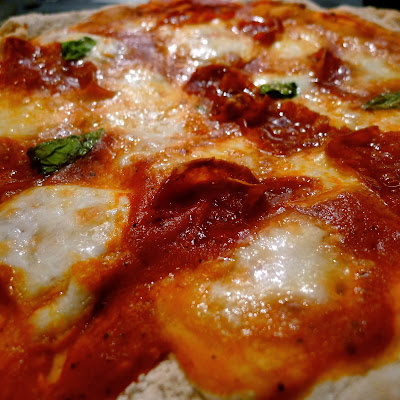
The Deep Pan Pizza!


I was lucky enough to have a visit for my mum and Elvis (our dog) this week.  I was greeted by a very excited hairy mutt and some home comforts, including a lovely bottle of my dad’s legendary tomato sauce.  On receiving a jar of delicious tomato sauce, one’s typical culinary inclination would naturally be pasta.  

I’ll let you into a little secret - I don’t really like pasta!

I know what you’re thinking… ‘the world’s worst student’ … but it really doesn’t inspire me.  On the plus side, this minor foible means that you have to think a bit more creatively. And after a short deliberation, it came to me (like a flash in a pan)……….Deep Pan Pizza!  It’s possibly one of the most tasty and warming treats, and with this recipe, it’s also a cheap one.  There’s no need for those first time ‘dough’ nerves, as this recipe is so easy! And the endless lists of topping options provide comfort and joy as we enter the season of cheer and goodwill.  For this recipe I opted for a simple mozzarella, chorizo and basil combo, which never fails to satisfy.  As the late Steve Jobs once said ‘Simplicity is the ultimate sophistication’.  Spend time selecting your toppings and I predict that you will be making this recipe every week.  But please take note…… when it comes to pizza topping, less is definitely more.


Ingredients


Makes one large pizza.

1 mug of self-raising flour
½ a mug of tepid water
A pinch of salt
Drizzle of olive oil
2 to 3 tbsp Tomato sauce/passata
1 chili
6 slices of chorizo
½ a ball of mozzarella
A few leaves of basil

Method

    1.     Put the flour, water, salt and oil into a food processor and blitz until combined to form a sticky dough. 

   2.     Flour a clean surface and rolling pin, then roll out the dough until it’s about a 1 cm thick.

     3.     Place a large frying pan on full heat, dust with flour and drizzle with olive oil. Dust the top of your dough with flour and fold in half. Then move into the pan and unfold. Pre heat the grill.

    4. Cook the pizza base in the pan for a few minutes then evenly spread 2-3 tbsp of tomato sauce leaving a gap around the edge for the crust. Tear and evenly scatter the mozzarella, together with the chorizo and basil on top of the pizza base. Then place the pan under the grill for 4-5mins until the mozzarella  melts and is slightly golden.


Saturday 12 October 2013

Lamb Koftas with Tabbouleh


Lamb koftas are simply one of my favorite meals. Whenever I’m feeling a lack of foodsperation they never fail to satisfy the taste buds. They’re simple to cook and prepare and taste wonderful. I think the true greatness in simple food, such as koftas, is that any leftovers can be easily frozen and enjoyed at a later date. They are very versatile and can be served in so many different ways; with pitta bread (my personal favorite), with a salad, in a stew, and even barbequed. For this recipe I decided to stick to pitta and accompany my koftas with a fresh herby tabbouleh. Tabbouleh is something that I have always enjoyed and these days its blossomed into a full blown love affair.  The fresh herby taste lightens any meal and is the perfect accompaniment to meat. It is also great served on its own  and makes a healthy lunchtime snack. 


Serves 4


Ingredients

Koftas

300g minced lamb
1 tbsp garamasala paste
1.5 tbsp roughly chopped pistachio nuts
1.5 tbsp runny honey

Tabbouleh

100g bulgur wheat
½ tsp allspice
1 medium tomato finely chopped
½ cucumber finely chopped
2 spring onions
1tbsp lemon juice
2 large handfuls of roughly chopped parsley
2 mint sprigs roughly chopped
1 handful of roughly chopped coriander
pinch of salt and pepper  

Method  


   1.First things first, soak you bulgur wheat in cool water for around 20mins. While this is soaking you can start with the koftas. Place the mince and the garamasala paste into a mixing bowl. With your hands, mix together making sure the paste is evenly distributed.


   2.Once this is mixed in, set aside and wait for the bulgur wheat to finish soaking. After soaking is complete, drain the water and put the wheat into a saucepan with cool water and place on a medium heat for around 20mins. 


  3.Now you can go back to your koftas, grab a small handful of lamb mix and shape into an oval about 3-4 inches long. You should be aiming to make around 10- 12. Once this is done, place in a frying pan with a drizzle of oil on a medium heat and cook for around 6mins on either side until they are a nice dark brown colour.

    4.This should mean that the bulgur wheat and koftas should be ready around the same time. The bulgur wheat should be soft but retain a bit of a bite. Once cooked drain any leftover liquid and place into a bowl with the roughly chopped herbs, cubed tomato, cubed cucumber, finely chopped spring onions and and the spices, salt and pepper. Mix together and squeeze the lemon juice over the mixture.

   5.Once the koftas are done turn the heat off, and into the pan add the chopped pistachios and honey. Stir in well making sure they are completely coated.

6.Serve as you wish. An accompaniment of pitta and coriander yoghurt is my personal fave.